
![]() Though often a less frequently used feature of Hyper-V, the import and export functions offer some very useful benefits. In Windows Server 2012 R2 these benefits get even better. I will explain how this functionality works, and why it is useful. I’ll also discuss how these functions are very different from the commonly used checkpoints in Hyper-V.
Though often a less frequently used feature of Hyper-V, the import and export functions offer some very useful benefits. In Windows Server 2012 R2 these benefits get even better. I will explain how this functionality works, and why it is useful. I’ll also discuss how these functions are very different from the commonly used checkpoints in Hyper-V.
Exports are More than Just Checkpoints
Checkpoints (formerly known as snapshots) are often used when making changes to a VM in the everyday use of Hyper-V. Checkpoints allow us to bookmark a point in time in which we can roll back to if things go wrong. For example, I often create a checkpoint before installing Windows Updates.
Checkpoints are really only designed for short term use. They use differencing disk technology to store any changes since the checkpoint was taken. Because of this, the checkpoints require the changes to be merged back into the parent virtual hard disk. The longer you wait to merge your changes, the longer the merge will take.
While there are now many backup solutions which backup entire VMs (entire VHDs, etc.) and not just the contents of the VM’s virtual disks, Hyper-V gives us much of this functionality right out of the box.
Creating an export of a Hyper-V virtual machine is not nearly as fast as a checkpoint, but it has some benefits of its own. Unlike checkpoints, exported virtual machines contain the entirety of that virtual machine and can be used for backup purposes or archiving unneeded VMs. Exports can also be used to create a copy of a production VM which can then be restored in a sandbox environment for testing or troubleshooting. The Hyper-V import offers an easy way to restore a VM to the same or new Hyper-V host with ease.
Exporting Hyper-V Virtual Machines in Windows Server 2012 R2
Exporting is a great way to archive a VM which is no longer needed, or as an ad-hoc backup. In Windows 2012 and previous versions, VMs could only be exported while they were powered off.
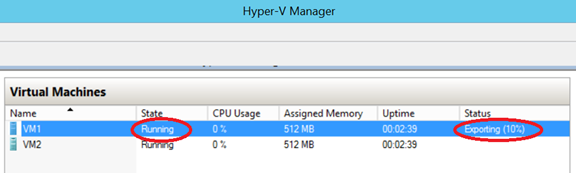
With Windows Server 2012 R2, the export feature becomes even more useful. VMs can now be exported while they are running. This means you can create a backup of a VM without ever taking it down.
Before Windows Server 2012 we also did not have the ability to export a VM directly to a network share. Instead, the VM would be exported to local storage and then copied across the network to an archive location. Now we can export directly to a desired network share.
Export a VM while Running or while Stopped:
- Select the virtual machine in Hyper-V Manager in Windows Server 2012 R2.
- Right-click on the selected virtual machine.
- Select Export.
- When prompted, select a location in which to export. This location can be either a locally attached drive or a network share.
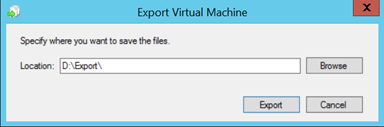
- The export progress will now be visible in the Status column of Hyper-V Manager.
Importing Hyper-V Virtual Machines in Windows Server 2012 R2
In previous versions of Windows Server, Hyper-V gave us the ability to import virtual machines to a new Hyper-V host. In order to import a virtual machine, you first had to prep that virtual machine by exporting it from its previous Hyper-V host.
In Windows Server 2012 R2, Hyper-V now gives us the ability to import virtual machines not previously exported. This is extremely helpful in situations where a host OS becomes corrupted, or if the most recent good backup of a VM is a file-level backup of the host. In my own lab environments, I change hard drives and re-install host operating systems often. This new feature has saved me countless hours on more than one occasion!
Importing a VM (whether it was exported or not)
- Copy the folder containing the virtual machines files (configuration files, snapshots, virtual hard disks, etc.) to the desired destination. This can be either an exported VM, or simply the VM folder from another Hyper-V host.
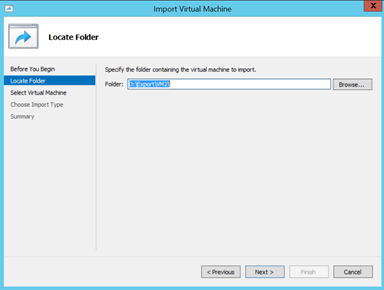
- From within the Actions pane in Hyper-V Manager, click on Import Virtual Machines.
- Browse to the folder you copied to the host in step #1 and click on the Next button.
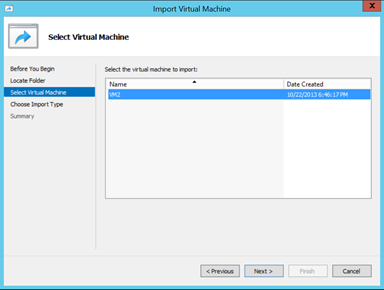
- Select the VM to be imported and click on the Next button.
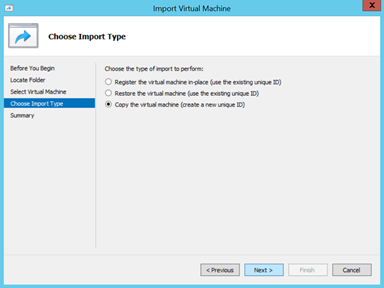
- Select the type of import to perform. If the virtual machine’s files are in the desired destination, then selecting “Register the virtual machine in-place” will quickly register the virtual machine without the need to make a copy of the files. If you are importing for a repository containing several virtual machines, you will most likely want to select either “Restore the virtual machine” or “Copy the virtual machine.” The latter will create new unique identifiers for the machine.
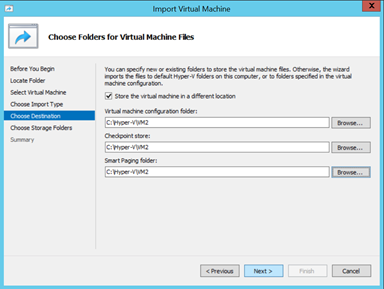
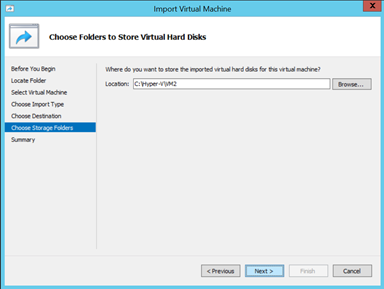
- If prompted, select where the virtual machine’s files and virtual hard disks should be stored.
- If the virtual machine being imported had been configured to use physical disks in pass-through mode, then you will have the opportunity to either remove the storage from the virtual machine’s configuration or attach new physical disks in pass-through mode.
- Finally, select the desired virtual network switch to use with the imported virtual machine, and click on the Next button. You will only be prompted for the virtual network switch if the VM was originally configured to use a different virtual network switch which is not on this Hyper-V host.
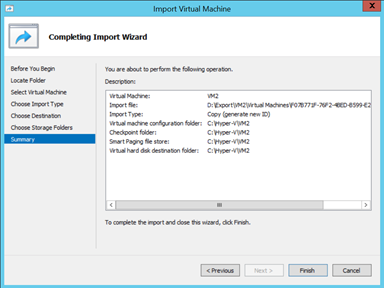
- Verify the summary screen information is accurate, and then complete the import.
Automation
These methods are using the GUI interface, but be aware that VMs can also be imported or exported by using a PowerShell script as well. For more information on using PowerShell with Hyper-V, see the Microsoft TechNet article “Hyper-V Cmdlets in Windows PowerShell“. Personally, I like to schedule my Hyper-V export PowerShell scripts using the Windows Task Scheduler. This way I can get an additional backup of selected VMs without taking up precious resources during normal business hours.
Using the Import/Export functionality in Hyper-V in Windows Server 2012 R2, can not only be useful by supplementing your existing backup strategy, but can make any Hyper-V administrator’s life a whole lot easier with the ability to export running VMs. This is just one more tool that gets so much better in Windows Server 2012 R2. By the way, did I mention you can script all of this using PowerShell?
Related Posts:
8 comments
3 pings
Skip to comment form
Thank you for the informative write up. Do you know if exports of vm’s, including ubuntu, server 2008 R2, and Server 2012 R2, can they be copied to a separate 2008 R2 running HyperV and be imported? Does HyperV 2012 export VM’s with 2008 R2 hyperV backwards compatibility?
Thank you,
J
Author
J, That is a great question. Last I heard Microsoft does not support migrating a VM to an older Hyper-V platform using the built in Import/Export feature. That being said, I believe there are a couple of ways to accomplish this, but your VMs can not be using the newer VHDX virtual hard drive format, but instead should be using the older VHD format (since VHDX wasn’t supported until Windows 2012).
Option 1: Export the VM, and copy the VHD files to the desired permanent location on the Windows Server 2008 R2 server. Manually create a new Virtual Machine. When you get to the screen to create a hard drive, instead use the existing VHDs.
Option 2: Use a 3rd party product like Veeam Free Edition to create a full backup of the VM (running on the Windows Server 2012 host). Once the backup is complete, restore the VM to the Windows Server 2008 R2 host. There are a few 3rd party solutions to do this, I tend to use Veeam Free as an example since it is “free” and simple to use.
Hello,
Enjoyed the ariticle. Could you share your Powershell script to automatically back-up a 2012 R2 Hyper-V guest?
Dear Robert,
I would like to clone a machine with a new UUID.
So I exported it, which puts me a nice snapshot of the machine in a folder.
But on import there is only an option to COPY everything (again) and change UUID, rather than just in-place change UUID + import.
Why ?? … but more importantly : Isn’t there a powershell / whatever way around this (stupid?) limitation of the MS Hyper-V GUI ?
Because what would need to be done to assign a new UUID ??
IMHO :
1.) pick a new (unique) UUID
2.) rename some files/directories to the new UUID and
3.) rewire all the dependencies within the export (e.g. search and replace in all files UUID-OLD -> UUID-NEW)
… so no real difficult tasks! .. so there should be CLI tool to do that for me, no ?
Please help :))
Tormen
Do need to shutdown with in the slice before going for export the slice?
Author
If you are running Windows Server 2012 R2 for your Hyper-V host operating system then you can export a VM (virtual machine) while it is running, so there is no need to first shut down the virtual machine. If you are running previous versions of Windows Server for your Hyper-V host’s operating system, then you will first need to either shut down or save the VM before you will have the option to export.
I almost never comment, however i did some searching and wound up
here Importing & Exporting Hyper-V VMs in Windows Server 2012
R2
We have a master vhdx stored on the network and import that on various virtual guest machines on various hosts. (1 guest per host). We use the Copy type to clone the master vhdx but use a unique id for every individual machine.
But to make changes to the ,master vhdx, do I have to import with Register type?
How is export different from copy/paste to new destination?
[…] you how to export and import machines from one Hyper-V host to another (see post titled “Importing & Exporting Hyper-V VMs in Windows Server 2012 R2“). I have also talked about building new virtual machines from scratch. There are many […]
[…] my previous post, Importing & Exporting Hyper-V VMs in Windows Server 2012 R2, I explain how to import and export a Hyper-V VM using the Hyper-V Manager GUI interface. Today I […]
[…] http://www.robertborges.us/2013/10/windows/windows-server-2012/importing-exporting-hyper-v-virtual-m… This is the way to preserve the configuration after the migration on both of the hosts the […]